Overview
Book Now allows tenants who visit your website or have access to the Book Now link to create and sign tenancies on their own.
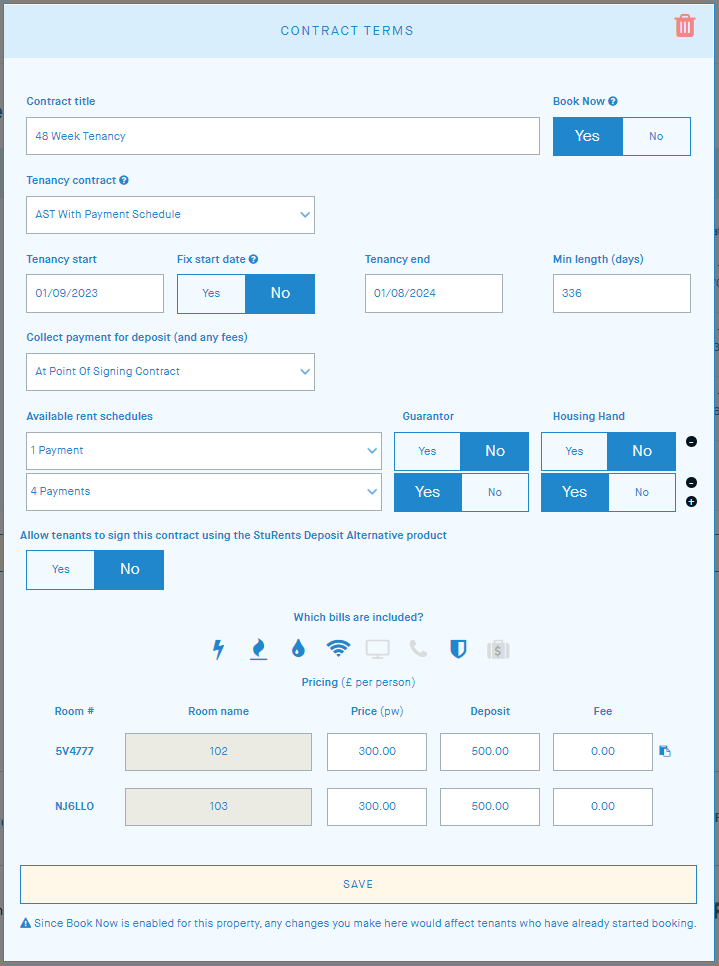
You can have multiple contract set ups for a property that tenants can choose from. For each contract term, you can set the following:
The contract template used.
Tenancy dates and minimum contract length.
If the start date is fixed.
When you want to collect deposits (and fees).
Rent schedules and guarantor requirements specific to the schedule.
What bills are included.
Room prices.
Requirements to use Book Now
Pro or Business Operations plan
You can learn more about the features included in our Operations product here.
Additionally, the following need to be available on your account:
At least one approved contract template on your Contracts dashboard
At least one rent schedule set up in your Rent settings

Setting up contracts for Book Now
On the Listings page, edit the property you wish to enable Book Now for.
Basics: Confirm that the room details are correct.
Availability:
Edit and existing availability or add a new one.
Enter a contract title
This is what the tenant sees when selecting a contract.
Click Yes to enable Book Now
Select the relevant contract template from the drop down.
Only approved templates from your Contracts dashboard are shown.
Set the start/end dates and minimum days for the contract
Changing the dates will automatically change the number of days (and vice versa) the first time; after that, you can manually adjust either field.
e.g. 01/08/2022 to 01/08/2023 with a minimum of 100 days
Set if the start date is fixed.
A fixed start date ensures that Book Now tenancies will always start on the date set and cannot be changed by the tenant. The end date can still be changed subject to the minimum length.
Set when you want to collect the deposit payment (and any fees).
Set the Guarantor requirements for each rent schedule.
Use the (+) and (-) buttons to add or remove additional rent options.
Select the relevant rent schedule(s).
If needed, select which bills are included.
Set the rent price, deposit, and fee for each room.
Rooms can be priced differently, or you can use the copy icon to copy the price/deposit/fee from the first room to the rest.
Click Save.
Once successfully saved, the contract set up will have a (blue tick icon) under Book Now.
Click the edit pencil icon to open the overlay again.
Click the chain link icon for the Book Now link that you can use on your website.
If the contract set up did not save successfully, there will be a (red X icon) under Book Now.
Opening the overlay will show you the errors that need to be fixed before Book Now can be enabled.


